[Android] UI Automator란, 사용법
< 목차 >
- UI Automator란?
- 주요 기능
- UI Automator Viewer로 레이아웃 계층 구조 보기
- 사용법 - 1. 프로젝트 설정
- 사용법 - 2. 테스트 코드 작성 : 앱 실행하기
- 사용법 - 3. 테스트 코드 작성 : 버튼 클릭하기
- 1. 앱에서 버튼을 찾아 클릭하기
- 2. 좌표값을 사용해서 클릭하기
- 사용법 - 4. 테스트 코드 실행
- 참고한 글, 전체 코드
UI Automator란?
https://developer.android.com/training/testing/ui-automator?hl=ko (공식문서)
UI Automator | Android 개발자 | Android Developers
UI Automator UI Automator는 시스템과 설치된 앱 전반에 걸쳐 앱 간의 기능적 UI 테스트를 실행하기에 적합한 UI 테스트 프레임워크입니다.참고: 이 프레임워크에는 Android 4.3(API 수준 18) 이상이 필요합
developer.android.com
UIAutomator는 안드로이드에서 UI를 테스트할 수 있게 도와주는 라이브러리입니다.
일반적으로 UI를 테스트하는 라이브러리는 아래와 같이 두 개이며, 각각 특징이 다릅니다. 테스트하려는 용도에 적합한 것을 사용하면 됩니다.
- UIAutomator : 블랙박스 테스트, 두 개 이상의 앱을 연동하여 테스트할 때 좋음
- Espresso : 화이트박스 테스트, 한 개의 앱만 테스트할 때 좋음
주요 기능
UI Automator 테스트 프레임워크에는 다음과 같은 주요 기능이 있습니다.
- UI Automator Viewer : 레이아웃 계층 구조를 볼 수 있습니다.
- Accessing device state (기기 상태 액세스) : 앱이 실행 중인 기기에 액세스하여 작업을 실행하기 위한 UiDevice 클래스를 제공합니다. UiDevice 클래스로 다음과 같은 작업을 실행할 수 있습니다.
- 기기 회전 변경
- ‘볼륨 업’과 같은 하드웨어 키 누르기
- 뒤로 가기 버튼, 홈 버튼 또는 메뉴 버튼 누르기
- UI Automator API : UI Automator API를 사용하면 앱의 구현 세부 정보를 몰라도 강력한 테스트를 작성할 수 있습니다.
UI Automator Viewer로 레이아웃 계층 구조 보기
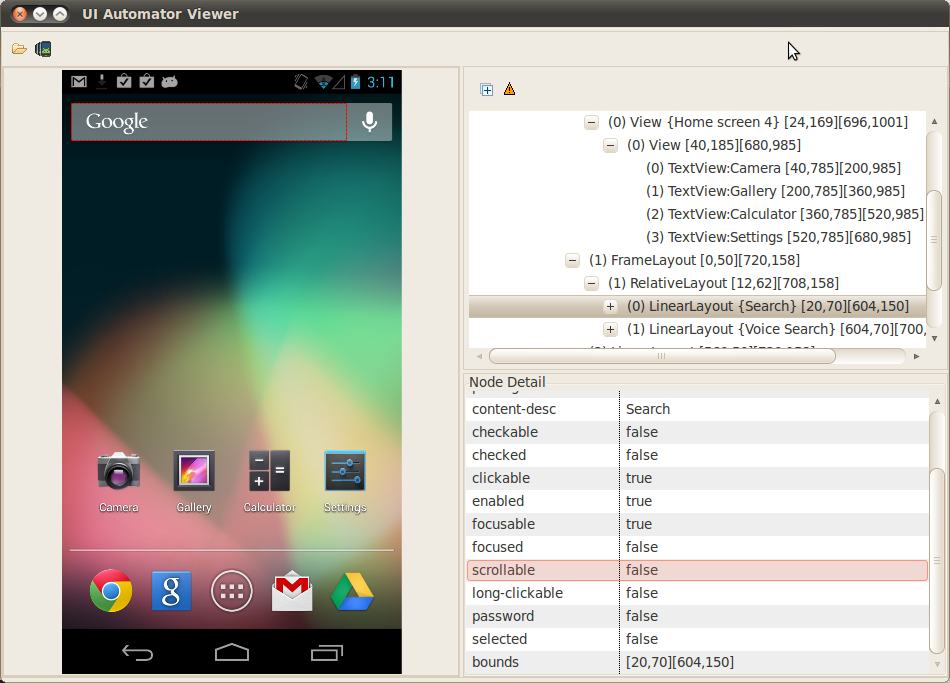
uiautomatorviewer 도구는 <android-sdk>/tools/bin 디렉터리에 있습니다.
- Text : 검색 필드에 기본값으로 보여지는 문자열입니다.
- resource-id : 앱을 개발할 때 부여한 TextView의 리소스 아이디를 볼 수 있습니다.
- class : 클래스 구조를 보니 TextView란 녀석은 Widget에 종속되어 있는 것을 알 수 있습니다.
- Package : 각 클래스가 속해 있는 폴더(그룹) 이름인 패키지 네임을 알 수 있습니다.
그 밖에도 클릭 상태, 체크 상태, 포커싱 상태, 스크롤 상태 등 많은 정보를 알 수 있습니다.
사용법 - 1. 프로젝트 설정
안드로이드 스튜디오에 프로젝트를 하나 만들어서 앱을 구현한 후, UIAutomator를 이용하여 테스트 코드를 작성하려면 gradle에 라이브러리를 추가해야 합니다.
build.gradle (Module: app) 의 dependency에 추가하면 됩니다.
dependencies{
    testImplementation 'junit:junit:4.13.2'
    androidTestImplementation 'androidx.test:runner:1.4.0'
    androidTestImplementation 'androidx.test.uiautomator:uiautomator:2.2.0'
}
사용법 - 2. 테스트 코드 작성 : 앱 실행하기
테스트 코드는 .../app/src/androidTest/ 에 있는 ExampleInstrumentedTest 파일(안드로이드 버전마다 파일 이름이 달라질 수 있습니다)에 작성해야 합니다. Unit Test에 작성하면 안됩니다.
해당 파일에 UI 테스트에 사용될 테스트 케이스를 설계(스크립트 작성)하면 됩니다.
@RunWith(AndroidJUnit4.class)
@SdkSuppress(minSdkVersion = 18)
Import문 바로 아래에 ‘Runwith’와 ‘SdkSuppress’를 반드시!! 추가해야 합니다.
먼저 Home 버튼을 누르고 내 앱을 실행시키는 코드입니다.
private UiDevice mDevice;
private Context context;

@Before
public void startMainActivityFromHomeScreen() throws UiObjectNotFoundException {
    // Initialize UiDevice instance : 디바이스(안드로이드 기기) 객체 가져오기
    mDevice = UiDevice.getInstance(getInstrumentation());

    // Start from the home screen : 홈 화면으로 나가기
    mDevice.pressHome();

    // Wait for launcher : 안드로이드 런처가 구동될때까지 3초간 대기 (3초 이후 실패)
    final String launcherPackage = mDevice.getLauncherPackageName();
assertThat(launcherPackage,notNullValue());
    mDevice.wait(Until.hasObject(By.pkg(launcherPackage).depth(0)), 3000);

    // Launch my app : 앱 구동하기
    context =getApplicationContext();
    // Context context = InstrumentationRegistry.getInstrumentation().getTargetContext();
    final Intent intent = context.getPackageManager().getLaunchIntentForPackage(context.getPackageName());
    intent.addFlags(Intent.FLAG_ACTIVITY_CLEAR_TASK);   // Clear out any previous instances : 이전에 호출된 인스턴스 초기화
    context.startActivity(intent);

    // Wait for the app to appear : 앱이 구동될 때까지 3초간 대기 (3초 이후 테스트 실패)
    mDevice.wait(Until.hasObject(By.pkg(launcherPackage).depth(0)), 3000);
}
코드 위에 있는 @Before 는 UI 테스트 코드임을 인식하는 역할을 하므로 꼭 선언해주어야 합니다.
@Before 는 UI 테스트를 시작하기 전, 앱 UI 동작에 방해되지 않도록 미리 초기화 작업을 할 때 사용합니다.
@Before 를 추가하지 않거나 ‘@’ 앞에 ‘//’ 주석을 추가할 경우 스크립트가 동작하지 않습니다.
사용법 - 3. 테스트 코드 작성 : 버튼 클릭하기
앱을 실행한 후에는 테스트하고 싶은 동작을 코드로 작성해주면 됩니다.
버튼을 찾고 클릭하는 동작을 시뮬레이션해보겠습니다.
1. 앱에서 버튼을 찾고 클릭하기
앱이 실행되고 있는 기기(UiDevice를 mDevice로 선언함)에서 findObject() 로 객체(버튼)를 찾아 클릭합니다.
private UiDevice mDevice;
private static final String MY_PACKAGE = "com.example.uiautomatorexample";

@Test
public void testButtonClick() throws InterruptedException {
    mDevice.findObject(By.res(MY_PACKAGE, "button1")).click();
    mDevice.findObject(By.res(MY_PACKAGE, "button2")).click();
    mDevice.findObject(By.res(MY_PACKAGE, "button3")).click();
    mDevice.findObject(By.res(MY_PACKAGE, "button4")).click();
    mDevice.findObject(By.res(MY_PACKAGE, "button5")).click();
    mDevice.findObject(By.res(MY_PACKAGE, "init_button")).click();

    Thread.sleep(1000);         // 1초 쉬기
}
코드 위에 있는 @Test 는 UI 테스트 코드임을 인식하는 역할을 하므로 꼭 선언해주어야 합니다.
@Test 는 @Before 가 선언된 코드가 실행된 후, 작성된 스크립트를 동작하게 합니다.
@Test 를 추가하지 않거나 ‘@’ 앞에 ‘//’ 주석을 추가할 경우 스크립트가 동작하지 않습니다.
2. 좌표값을 사용해서 클릭하기
절대좌표값을 이용해서 해당 좌표값이 가리키는 곳을 클릭하게 할 수 있습니다.
@Test
public void testCoordinateClick() throws InterruptedException {
    mDevice.click(119, 305);    // 임의로 입력한 좌표입니다.
    mDevice.click(359, 317);
    mDevice.click(610, 325);
}
사용법 - 4. 테스트 코드 실행
2, 3번에서 작성한 코드를 실제로 실행하는 단계입니다.
에뮬레이터를 실행하거나 실제 기기를 연결한 후,
Android Studio > Tools > Run > 2. ExampleInstrumentedTest > Run 버튼을 클릭합니다.
혹은 Android Studio 에디터 화면의 ‘ExampleInstrumentedTest’ 클래스에서 Run 버튼을 클릭합니다.

UI 테스트가 실행되면 하단 콘솔뷰에서 테스트 진행 과정과 테스트 결과에 대한 PASS/FAIL 유무를 알 수 있습니다. @Before 가 선언된 스크립트가 먼저 실행되고, @Test 가 선언된 스크립트가 나중에 실행됩니다.

참고한 글, 전체 코드
testing-samples/ChangeTextBehaviorTest.java at master · android/testing-samples
GitHub - android/testing-samples: A collection of samples demonstrating different frameworks and techniques for automated testin
A collection of samples demonstrating different frameworks and techniques for automated testing - GitHub - android/testing-samples: A collection of samples demonstrating different frameworks and te...
github.com
UIAutomoator 샘플 테스트 코드
https://developer.android.com/training/testing/ui-automator?hl=ko#accessing-device-state
UI Automator | Android 개발자 | Android Developers
UI Automator UI Automator는 시스템과 설치된 앱 전반에 걸쳐 앱 간의 기능적 UI 테스트를 실행하기에 적합한 UI 테스트 프레임워크입니다.참고: 이 프레임워크에는 Android 4.3(API 수준 18) 이상이 필요합
developer.android.com
안드로이드 개발 문서 : UI Automator
https://developer.android.com/training/testing/other-components/ui-automator#ui-automator-apis
Write automated tests with UI Automator | Android Developers
Write automated tests with UI Automator UI Automator is a UI testing framework suitable for cross-app functional UI testing across system and installed apps. The UI Automator APIs let you interact with visible elements on a device, regardless of which Acti
developer.android.com
안드로이드 개발 문서 : UI Automator로 자동화된 테스트 작성
Android UI Automator 2.0 Starter #1
Android UI Automator 2.0 Starter #1
안녕하세요. 안드로이드 UI 자동화 테스팅 프레임워크 중 하나인 “Android UI Automator 2.0” (이...
blog.naver.com
UI Automator 2.0을 사용하여 테스트 코드 작성하기
안드로이드 UIAutomator로 UI 테스트, 가장 쉽고 빠른 가이드
안드로이드 UIAutomator로 UI 테스트, 가장 쉽고 빠른 가이드
UIAutomator는 UI를 테스트하는 라이브러리입니다. UIAutomator는 블랙박스 테스팅이며, 두개 이상의 앱을 함께 테스트할 수 있습니다. UiDevice, Until, By, BySelector 클래스를 지원하며 이 클래스들로 테스
codechacha.com
안드로이드 UIAutomator로 UI 테스트, 가장 쉽고 빠른 가이드
Android 自动化测试关于悬浮窗点击(DecorView)_杨小扬的博客-CSDN博客
Android 自动化测试关于悬浮窗点击(DecorView)_杨小扬的博客-CSDN博客
本文对Robotium的悬浮窗实现进行一点调研 Robotium本身支持悬浮窗点击,这里我们可以参考详细看下源码 与Uiautomator稍微不一样的是Robotium获取到的是Activtity的rootview,而Uiautomator直接
blog.csdn.net
부동 창 클릭에 대한 Android 자동화 테스트(DecorView)
https://github.com/EEEUN/UI-Automator-Test
GitHub - EEEUN/UI-Automator-Test: 안드로이드에서 제공하는 UI 테스트용 라이브러리인 UI Automator 샘플코
안드로이드에서 제공하는 UI 테스트용 라이브러리인 UI Automator 샘플코드. Contribute to EEEUN/UI-Automator-Test development by creating an account on GitHub.
github.com
전체코드 path
: app/src/androidTest/java/com/example/uiautomatortest/ExampleInstrumentedTest.java